Use Terraform to create an AWS CloudFront distribution from S3 secured with Cognito, Signed Cookie and Lambda@Edge


Madeleine von Hausswolff
Systemutvecklare
This is a complete solution to use Amazon CloudFront as a CDN to serve images or other content saved in an S3 bucket and distributed on the web. The content is protected with signed cookies authorized through Amazon Cognito. To be able to keep the solution secure in the long run, it also includes automatic key rotation. The private key for the signed cookie is kept safe in AWS Secrets Manager. The public key is configured in CloudFront and AWS Lambda@Edge is used to verify the token from Cognito and create a signed cookie. For rotation of the RSA key pair the Secrets Manager is configured to execute an AWS Lambda periodically. The whole setup is created in Terraform and can be found at the link below.
https://github.com/madvonh/cloudfront-cognito-signed-cookies-terraform.
Example use case
So why would we do this? Well, imagine you have a hybrid or mobile app that you want to serve with images. They could of course reside within the application. That would do for those that come shipped with the app, but what if the app needs to have photos uploaded by different users to be shared to all users? Then we could use an S3 bucket in AWS to store the images. If we also want the images to be cached for better performance, CloudFront is perfect for the purpose of serving them back to the app!
We have just one more requirement, and it is a crucial one; You don’t want the images to be public. Only logged in users should be able to retrieve the images. Since the identity provider for the app is Cognito User Pool, it should also be used for the images to achieve single sign on. However, there is no way in AWS to just add it in front of CloudFront. What we have is the option to protect content with a signed cookie. To be able to use Cognito we will need to exchange an access token for a signed cookie. This is a simplified overview:
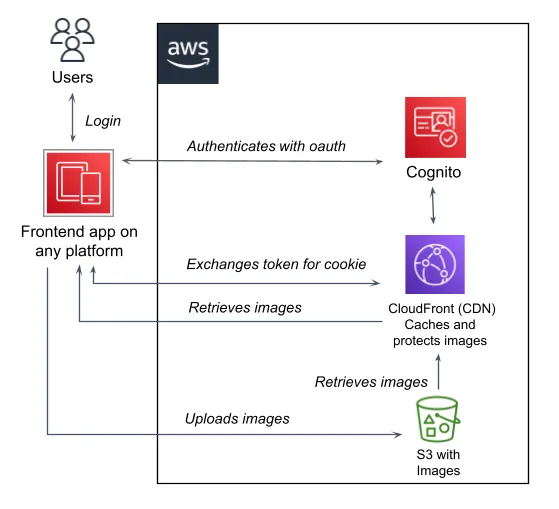
User flow
- The user authenticates from some app that is configured to use the Cognito User Pool instance as its identity provider.
- The app adds an Authorization header with the user’s bearer token and makes a request to the cookie endpoint in CloudFront.
- The Lambda@Edge executes on Viewer request. It verifies the token and responds with the signed cookie if the check was successful.
- Et voilà! The cookie will be attached to every request sent back from the users app. This works since all cookies automatically are sent back to the domain that has set it and the cookie endpoint and images reside on the same domain. So, all images added by a link to the source in CloudFront will show in the app and continue to do so while the cookie is valid.
Walkthrough
This walkthrough will hopefully explain enough for you to understand the setup. There are things intentionally left out, with the assumption that it is possible to look it up on your own. Please give feedback if this doesn’t work out for you.
Cognito login with OAuth2
The Cognito User Pool and Client configured in Terraform can be used by any frontend application as an identity provider. A frontend app can’t use a secret, therefore the generate_secret is set to “false”. The parameter allowed_oauth_flows in the client setup has “code” as one of the values.
This setting will allow users to sign in with the Authorization Code grant type. The logged in user will then be able to retrieve an access token from Cognito and use it to get the signed cookie needed.
resource "aws_cognito_user_pool" "user_pool" {
  name                = "Signed cookie example"
  username_attributes = ["email"]
  username_configuration {
    case_sensitive = false
  }
  auto_verified_attributes = ["email"]
  password_policy {
    minimum_length                   = 8
    require_uppercase                = true
    require_lowercase                = true
    require_symbols                  = true
    require_numbers                  = true
    temporary_password_validity_days = 7
  }

  email_configuration {
    email_sending_account = "COGNITO_DEFAULT"
  }

  verification_message_template {
    default_email_option = "CONFIRM_WITH_CODE"
  }

  schema {
    attribute_data_type      = "String"
    developer_only_attribute = false
    mutable                  = true
    name                     = "email"
    required                 = true

    string_attribute_constraints {
      min_length = 5
      max_length = 50
    }
  }
}

resource "aws_cognito_user_pool_client" "client" {
  name                   = "Signed cookie example"
  user_pool_id           = aws_cognito_user_pool.user_pool.id
  generate_secret        = false
  refresh_token_validity = 30
  access_token_validity  = var.cookie_and_token_expiration_time_in_minutes
  id_token_validity      = 10
  token_validity_units {
    id_token      = "minutes"
    refresh_token = "days"
    access_token  = "minutes"
  }

  prevent_user_existence_errors = "ENABLED"
  explicit_auth_flows = [
    "ALLOW_CUSTOM_AUTH",
    "ALLOW_USER_SRP_AUTH",
    "ALLOW_REFRESH_TOKEN_AUTH"
  ]
  enable_token_revocation              = true
  callback_urls                        = [var.cognito_client_callback_url]
  logout_urls                          = [var.cognito_client_logout_url]
  allowed_oauth_flows_user_pool_client = true
  allowed_oauth_flows                  = ["code", "implicit"]
  allowed_oauth_scopes                 = ["phone", "email", "openid", "aws.cognito.signin.user.admin", "profile"]
}
Use an Identity Pool and attach IAM policies
If the logged in user will need to access other resources in the AWS account, an Identity Pool is needed. In our case, the user should be able to upload files to an S3 account. The Identity Pool configured in Terraform is connected to the Cognito User Pool. The web identity roles for authenticated and unauthenticated are configured to be attached to it.
More about web identity federation on Amazon:
https://docs.aws.amazon.com/IAM/latest/UserGuide/id_roles_providers_oidc.html
resource "aws_cognito_identity_pool" "identity_pool" {
  identity_pool_name               = "Signed cookie example"
  allow_unauthenticated_identities = false
  allow_classic_flow               = true

  cognito_identity_providers {
    client_id               = aws_cognito_user_pool_client.client.id
    provider_name           = aws_cognito_user_pool.user_pool.endpoint
    server_side_token_check = false
  }
}
resource "aws_cognito_identity_pool_roles_attachment" "roles_attachment" {
identity_pool_id = aws_cognito_identity_pool.identity_pool.id
roles = {
"authenticated" = aws_iam_role.authenticated.arn
"unauthenticated" = aws_iam_role.unauthenticated.arn
}
}
So, we have attached the IAM roles to our identity pool instance. The next step is to grant access to the S3 bucket for the authenticated role. We can do this by configuring the bucket’s policy and CORS (Cross-Origin Resource Sharing) settings. The policy should include the following actions: “s3:GetObject”, “s3:ListBucket”, “s3:PutObject” and “s3:DeleteObject”. These actions will allow the user to upload, retrieve, and delete objects in the bucket. Additionally, the cors_rule parameter, with the allowed_origins set to “*”, will enable requests from any origin to be sent to the bucket over the internet. However, it is recommended to replace the “*” with specific origin values to restrict access to desired origins.
The bucket also needs to be accessed by our CloudFront instance. The following Terraform script configures the bucket’s policy:
resource "aws_s3_bucket" "photo_bucket" {
  bucket = "${var.project_prefix}-photos"
}

resource "aws_s3_bucket_acl" "photo_bucket_acl" {
  bucket = aws_s3_bucket.photo_bucket.id
  acl    = "private"
}

resource "aws_s3_bucket_policy" "authenticated_access" {
  bucket = aws_s3_bucket.photo_bucket.id
  policy = data.aws_iam_policy_document.authenticated_access.json
}

data "aws_iam_policy_document" "authenticated_access" {
  statement {
    principals {
      type        = "AWS"
      identifiers = [aws_iam_role.authenticated.arn]
    }

    actions = [
      "s3:GetObject",
      "s3:ListBucket",
      "s3:PutObject",
      "s3:DeleteObject"
    ]

    resources = [
      aws_s3_bucket.photo_bucket.arn,
      "${aws_s3_bucket.photo_bucket.arn}/*",
    ]
  }

  statement {
    actions = [
      "s3:GetObject",
      "s3:ListBucket"
    ]
    resources = [
      aws_s3_bucket.photo_bucket.arn,
      "${aws_s3_bucket.photo_bucket.arn}/*",
    ]

    principals {
      type        = "AWS"
      identifiers = ["${aws_cloudfront_origin_access_identity.origin_access_identity.iam_arn}"]
    }
  }
}

resource "aws_cloudfront_origin_access_identity" "origin_access_identity" {
}

resource "aws_s3_bucket_cors_configuration" "photo_bucket_cors" {
  bucket = aws_s3_bucket.photo_bucket.id

  cors_rule {
    allowed_headers = ["*"]
    allowed_origins = ["*"]
    allowed_methods = ["HEAD", "GET", "PUT", "POST", "DELETE"]
    expose_headers  = ["ETag"]
    max_age_seconds = 3000
  }
}
Configure a Trusted Key Group.
To protect a distribution in CloudFront, you can just add a Trusted Key Group to the cache behavior and the content is no longer publicly accessible. Then, to let the authenticated users access the content, we need to configure the trusted key group to contain at least one valid Public Key. That key needs to be the public part of a 2048-bit RSA Key Pair, since it is the only key type accepted by CloudFront. The Private Key from the key pair is kept safe in Secrets Manager and used to create the signed cookie. CloudFront will automatically validate all requests by checking the cookies. This way requests with correctly signed cookies will have access to the content.
You can find more info about signed cookies in CloudFront on Amazon: https://docs.aws.amazon.com/AmazonCloudFront/latest/DeveloperGuide/PrivateContent.html
https://docs.aws.amazon.com/AmazonCloudFront/latest/DeveloperGuide/private-content-signed-cookies.html
Cookie endpoint in Cloudfront
For a cookie to be accepted by the browser it will need to be created from the same domain as where the content resides, in this case it will be a Lambda@Edge executed in CloudFront. It is possible to set up an endpoint as a part of the cache behavior. We have one with the path-patten “cookie/*” and the lambda associated with it will execute at every request to the address: https://[xxx].cloudfront.se/cookie.
This is a detailed overview of the whole setup:
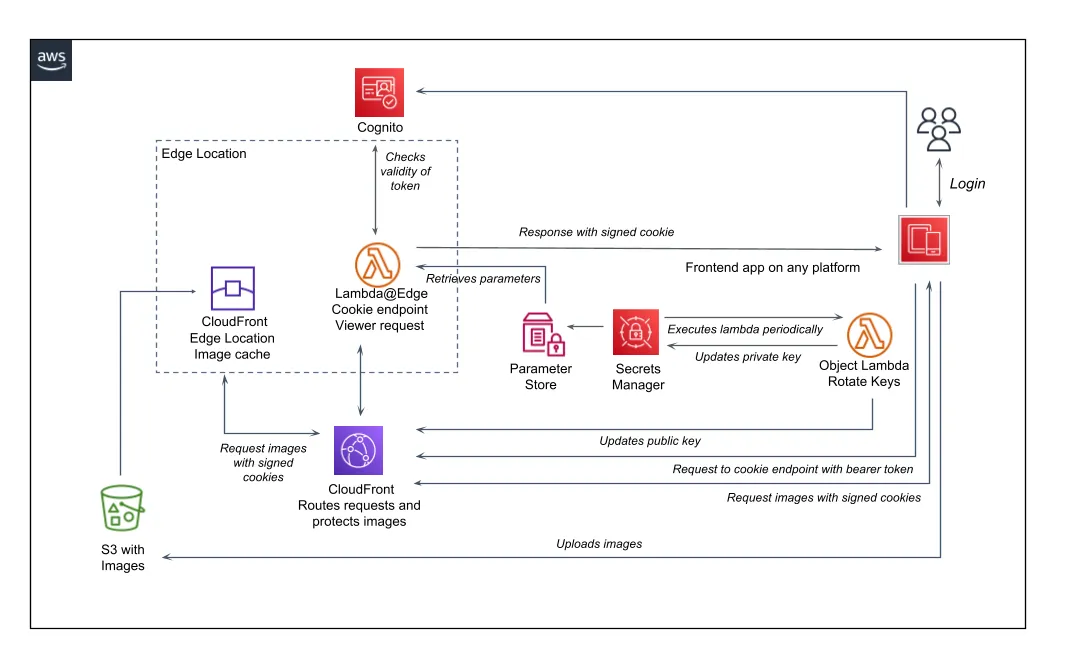
It is required that every cache behavior has an origin configured. However, in this case the lambda will shortcut the request and return the response to the user, so the request will never reach the origin. So the origin “www.google.com” will never be hit but it still needs to be there.
resource "aws_cloudfront_public_key" "VerifySigningPublicKey" {
  encoded_key = var.public_key_pem
  name        = "${var.project_prefix}-DUMMY_KEY"
  # remove below if you have changed the value of the encoded_key
  lifecycle {
    ignore_changes        = [encoded_key]
    create_before_destroy = true
  }
}

resource "aws_cloudfront_key_group" "VerifySigningKeyGroup" {
  items = [aws_cloudfront_public_key.VerifySigningPublicKey.id]
  name  = "${var.project_prefix}-group"
  lifecycle {
    ignore_changes = [items]
  }
}

resource "aws_cloudfront_distribution" "ImageDistribution" {
  enabled         = "true"
  http_version    = "http2"
  is_ipv6_enabled = "true"

  ordered_cache_behavior {
    allowed_methods = ["HEAD", "GET", "OPTIONS"]
    cache_policy_id = "4135ea2d-6df8-44a3-9df3-4b5a84be39ad" # CachingDisabled
    cached_methods  = ["HEAD", "GET"]
    compress        = "true"
    default_ttl     = "0"
    path_pattern    = "cookie/*"

    lambda_function_association {
      event_type   = "viewer-request"
      include_body = "false"
      lambda_arn   = "${aws_lambda_function.EdgeCacheRequestSigner.arn}:${aws_lambda_function.EdgeCacheRequestSigner.version}"
    }

    max_ttl          = "0"
    min_ttl          = "0"
    smooth_streaming = "false"
    # Could be any value, since this target never will be hit
    target_origin_id       = "www.google.com"
    viewer_protocol_policy = "redirect-to-https"
  }

  default_cache_behavior {
    allowed_methods    = ["HEAD", "GET"]
    trusted_key_groups = [aws_cloudfront_key_group.VerifySigningKeyGroup.id]
    cached_methods     = ["HEAD", "GET"]
    compress           = "true"

    forwarded_values {
      query_string = false

      cookies {
        forward = "none"
      }
    }
    min_ttl     = "0"
    max_ttl     = "86400"
    default_ttl = "3600"

    smooth_streaming       = "false"
    target_origin_id       = aws_s3_bucket.photo_bucket.bucket_regional_domain_name
    viewer_protocol_policy = "redirect-to-https"
  }

  origin {
    connection_attempts = "1"
    connection_timeout  = "10"

    custom_origin_config {
      http_port                = "80"
      https_port               = "443"
      origin_keepalive_timeout = "5"
      origin_protocol_policy   = "https-only"
      origin_read_timeout      = "30"
      origin_ssl_protocols     = ["TLSv1.2"]
    }

    domain_name = "www.google.com"
    origin_id   = "www.google.com"
  }

  origin {
    connection_attempts = "3"
    connection_timeout  = "10"

    s3_origin_config {
      origin_access_identity = aws_cloudfront_origin_access_identity.origin_access_identity.cloudfront_access_identity_path
    }
    domain_name = aws_s3_bucket.photo_bucket.bucket_regional_domain_name
    origin_id   = aws_s3_bucket.photo_bucket.bucket_regional_domain_name
  }
}
You can find more information how Cognito and Lambda@Edge work together on the following links.
https://cloudonaut.io/authentication-at-the-edge-with-lambda-edge-cognito/
https://github.com/disney/terraform-aws-lambda-at-edge-cognito-authentication
Lambda@Edge to create cookies.
To enable CloudFront to respond with correctly signed cookies we must add some custom code. In our case, we use a Lambda@Edge that will verify the user’s token and create the signed cookie. The edge-cache-request-signer lambda will execute on the specified endpoint at every viewer request. We use the same lambda both to create a new cookie and to remove an earlier created cookie. The code for the two tasks is so similar, so there was no need to duplicate it into two lambdas. We simply check if the user’s request path and if it ends with “/remove” it expires an existing cookie instead of creating a new one.
Lambda@Edge differs a bit from the ordinary Lambdas. Since there is a need for high performance it is saved on different edge locations close to the user. One thing is that it can’t have environment variables. So, a way to use variables despite this is to use AWS Systems Manager (SSM) Parameter Store. Then the key-value pairs are saved at one place and just referenced to by all the copies of the lambda saved on edge locations.
As mentioned above, the private key used to create the cookie is kept in the secrets manager. However, in the signer lambda, we use the ssm parameter store to retrieve it. We could have accessed it directly, but Amazon has made the option to get it through the parameter store available. This helps us to simplify the lambda code.
Read more about the difference between secrets manager and parameter store below.
https://medium.com/awesome-cloud/aws-difference-between-secrets-manager-and-parameter-store-systems-manager-f02686604eae
Template to enable multiple stacks
To be able to set up multiple stacks in the same account (e.g. dev and stage), we make use of a prefix to the parameter name in SSM Parameter Store that is a changeable variable in the Terraform solution. To be able to inject the value of the variable into the Lambda we use a template for the index.js file. In our case the Terraform template will replace all `${ssm_prefix}` with the value of the variable set in a .tfvars file. For example, `${ssm_prefix}-cloudfront-domain` will be transformed into `devsignauth-cloudfront-domain`. If “devsignaut” was the value of ssm_prefix. This allows us to inject the ssm parameter names into the index.js file on Terraform apply. The process copies the original file and saves it to a new local file.
When a Lambda is used in a lambda_function_association in CloudFront (see Terraform code above), it needs to refer to a specific version of the lambda. This is why we need to set the parameter publish to “true” so that the version is created.
The region for the Lambda function is hardcoded to “us-east-1”. While you can choose the region for most resources, Lambda@Edge is an exception. It must be deployed specifically in the “us-east-1" region.
resource "local_file" "templated" {
  content = templatefile("${path.module}/edge-cache-request-signer/index.js", {
    ssm_prefix = var.project_prefix,
  })
  filename = "${path.module}/edge-cache-request-signer/deploy/index.js"
}

data "archive_file" "EdgeCacheRequestSignerArchive" {
  depends_on = [
    local_file.templated
  ]
  type        = "zip"
  source_dir  = "${path.module}/edge-cache-request-signer/deploy"
  output_path = "${path.module}/edge-cache-request-signer/deploy/edge-cache-request-signer.zip"
}

resource "aws_lambda_function" "EdgeCacheRequestSigner" {
  architectures                  = ["x86_64"]
  description                    = "Signing requests to cache"
  function_name                  = "edge-cache-request-signer"
  handler                        = "index.handler"
  filename                       = data.archive_file.EdgeCacheRequestSignerArchive.output_path
  memory_size                    = "128" # max size allowed for "viewer-request" event type
  package_type                   = "Zip"
  reserved_concurrent_executions = "-1"
  role                           = aws_iam_role.EdgeCacheRequestSignerFunctionRole.arn
  runtime                        = "nodejs16.x"
  timeout                        = "5"
  provider                       = aws.us-east-1
  # publish will publish a new version of the lambda.
  publish                        = true
  source_code_hash               = data.archive_file.EdgeCacheRequestSignerArchive.output_base64sha256
Key rotation
To keep up the security of the signed cookie solution, we need to ensure that the RSA key pair in use is rotated regularly. In this solution, we have that process automated by the Secrets Manager. It will rotate the key by executing a lambda according to a specified schedule. In our case it will generate a new RSA key pair and save it to Secrets Manager (private) and CloudFront (public).
To be able to setup and deploy the complete solution in Terraform we use a dummy RSA Key pair to begin with. But don’t worry, this one won’t be used since it is rotated immediately after deployment.
resource "aws_secretsmanager_secret" "SigningPrivateKey" {
  name        = var.signing_key_name
  description = "Private key for CloudFront trusted keygroup"
  provider    = aws.us-east-1
}

resource "aws_secretsmanager_secret_version" "SigningPrivateKeyVersion" {
  secret_id     = aws_secretsmanager_secret.SigningPrivateKey.id
  secret_string = var.private_key_pem
  provider      = aws.us-east-1
}

resource "aws_secretsmanager_secret_rotation" "RsaKeypairRotation" {
  secret_id           = aws_secretsmanager_secret.SigningPrivateKey.id
  rotation_lambda_arn = aws_lambda_function.KeyRotator.arn
  provider            = aws.us-east-1

  rotation_rules {
    automatically_after_days = var.automatically_after_days
  }
}
To do the rotation without interfering with any logged in users, the old public key is not removed immediately from the key group. It is kept there until the next key rotation. This works fine since there can be multiple private keys in a key group. After key rotation is done, there will always be two public keys in the key group. Every key uploaded will get an id generated by cloudfront. This id must be used by the edge-cache-request-signer lambda (see description above) to create the signed cookie. So to enable the signer lambda above to access the new id, the SSM parameter that holds it will be updated with the id as the new value.
Here are all steps the key-rotater lambda in this solution takes to manage the rotation:
- Creates a new Key Pair.
- Identify which key to keep, if any.
- Removes all other keys from the key group, which can be the initial dummy key or the one rotated on last execution.
- Deletes all identified other keys.
- Adds the newly created public key to CloudFront.
- Adds the public key to CloudFront Key Group.
- Updates the private key in Secrets Manager.
- Updates value for public keyId in SSM parameter store with the id of the newly created CloudFront key.
Final words
This article explains the crucial parts on how to set up a CDN distribution of images or other content with AWS services and Terraform. The repo is ready to be deployed and will create all pieces needed. What you need to do is add your own variables in a “.tfvars” file. If you want to deploy more than one copy of the solution, you can add another “.tfvars” with different values and use it instead. If you want to add one that automatically loads on Terraform apply, name it “terraform.tfvars”.
If you want to spice up this distribution with resizing images on the fly before caching them check out the following blog post. https://aws.amazon.com/blogs/storage/modify-images-cached-in-amazon-cloudfront-using-amazon-s3-object-lambda/
This is a complete backend solution. To use it you will have to create a frontend to it. This can be done with the technique of your choice. It will need a possibility for users to login with the Cognito User Pool created by this Terraform script. If you would like to see an example on how this can be done with Ionic/Angular, stay tuned for my next blog post.
Remember to follow the instructions in the readme file in the github repo:
https://github.com/madvonh/cloudfront-cognito-signed-cookies-terraform