Don’t let your EKS clusters eat up all your IP addresses!

Joakim Hansson
Systemutvecklare
Why should I care, I can just allocate a big CIDR range in my AWS VPC and bob’s your uncle. Right?
Well, not always. IP addresses can be a limited resource and in this article, you’ll read about one of the reasons.
I was tasked with setting up a new Kubernetes cluster at my client and was told I only have 50 IP addresses to work with. Naturally, I asked if I could have a bigger range but it turns out that in certain enterprise environments, there are often AWS transit gateways involved. A transit gateway is a unified way to connect VPCs, on-prem networks etc. in AWS.
One of the main limitations is that non of the connected networks can have overlapping CIDRs. In a transit gateway, routes are propagated to the transit gateway route table which would cause all sorts of fun issues if things overlapped.
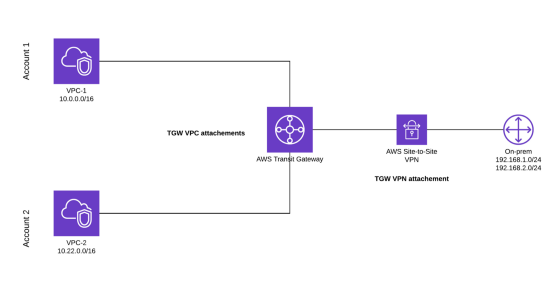
As you can see in the example above, the CIDRs 10.0.0.0/16, 10.22.0.0/16, 192.168.1.0/24 and 192.168.2.0/24 are not overlapping and is therefore valid. If you tried connecting another VPC to the transit gateway with a CIDR range of 10.0.0.0/16 it would be invalid as it’s overlapping with VPC-1.
Why can this be an issue when spinning up Kubernetes clusters in AWS?
When using EKS with the native VPC networking (AWS VPC CNI) every pod is assigned an IP address through the same ENIs that your EKS workers use. In a transit gateway-connected network, that IP might be worth more than gold. As you can imagine, this quickly eats up available IP addresses in a shared enterprise network. In production clusters where you might run a multitude of stuff for monitoring, ingress controllers, service meshes etc. you might not even have enough IP addresses to run your microservices (spoiler alert, this is what happened in my case).
Do we stop running cool stuff in our clusters and just try to not use up our IP addresses then? H*ck no!
Thankfully, since this is a common issue for enterprises there are multiple solutions. I will teach you about the official AWS solution in this article 🚀.
AWS VPC CNI custom networking
CNI (container network interface) is a CNCF project which helps define a cloud-native way to do networking with containers. AWS way of doing this with their EKS clusters is through their AWS VPC CNI add-on. The default setting in the add-on is to assign IP addresses to your pods from the subnets that the worker nodes are running on. However, there is an additional environment variable that you can set for the add-on which enables custom networking.
Introducing AWS_VPC_K8S_CNI_CUSTOM_NETWORK_CFG
By enabling this setting for the AWS VPC CNI, you can attach an additional CIDR block to your VPC and force your pods to use IPs from that CIDR block through a CRD (custom resource definition) called ENIConfig, instead of taking up IP addresses from your enterprise assigned CIDR block.
For the sake of keeping this article original, I will show how to do this in an automated fashion with the help of helm and terraform. There is a guide for doing this manually with kubectl on the official EKS workshop advanced networking guide.
tl;dr: All code used in this article is found here
Preparing your AWS environment for custom CNI networking
The first thing we need to do is to assign a new CIDR block to our VPC that our Kubernetes pods can use. EKS supports the following two CIDR ranges: 100.64.0.0/10 and 198.19.0.0/16.
Associate a new CIDR block with your VPC. We’ll be using 100.64.0.0/16.
Now create the subnets and associate them with our existing VPC subnets route tables. We want high availability here, so we’re creating 3 subnets in 3 different availability zones.
########################################################################################
#                                                                                      #
#      Create a new subnet in az-1a and associate it with the az-1a route table        #
#                                                                                      #
########################################################################################
resource "aws_subnet" "extra_az_1a" {
  vpc_id            = var.eks_vpc_id
  cidr_block        = "100.64.0.0/19"
  availability_zone = "eu-west-1a"

  depends_on = [
    aws_vpc_ipv4_cidr_block_association.secondary_cidr
  ]
}

resource "aws_route_table_association" "a" {
  subnet_id      = aws_subnet.extra_az_1a.id
  route_table_id = var.az_1a_route_table_id
}

########################################################################################
#                                                                                      #
#      Create a new subnet in az-1b and associate it with the az-1b route table        #
#                                                                                      #
########################################################################################

resource "aws_subnet" "extra_az_1b" {
  vpc_id            = var.eks_vpc_id
  cidr_block        = "100.64.32.0/19"
  availability_zone = "eu-west-1b"

  depends_on = [
    aws_vpc_ipv4_cidr_block_association.secondary_cidr
  ]
}

resource "aws_route_table_association" "b" {
  subnet_id      = aws_subnet.extra_az_1b.id
  route_table_id = var.az_1b_route_table_id
}

########################################################################################
#                                                                                      #
#      Create a new subnet in az-1c and associate it with the az-1c route table        #
#                                                                                      #
########################################################################################


resource "aws_subnet" "extra_az_1c" {
  vpc_id            = var.eks_vpc_id
  cidr_block        = "100.64.64.0/19"
  availability_zone = "eu-west-1c"


  depends_on = [
    aws_vpc_ipv4_cidr_block_association.secondary_cidr
  ]
}

resource "aws_route_table_association" "c" {
  subnet_id      = aws_subnet.extra_az_1c.id
  route_table_id = var.az_1c_route_table_id
}
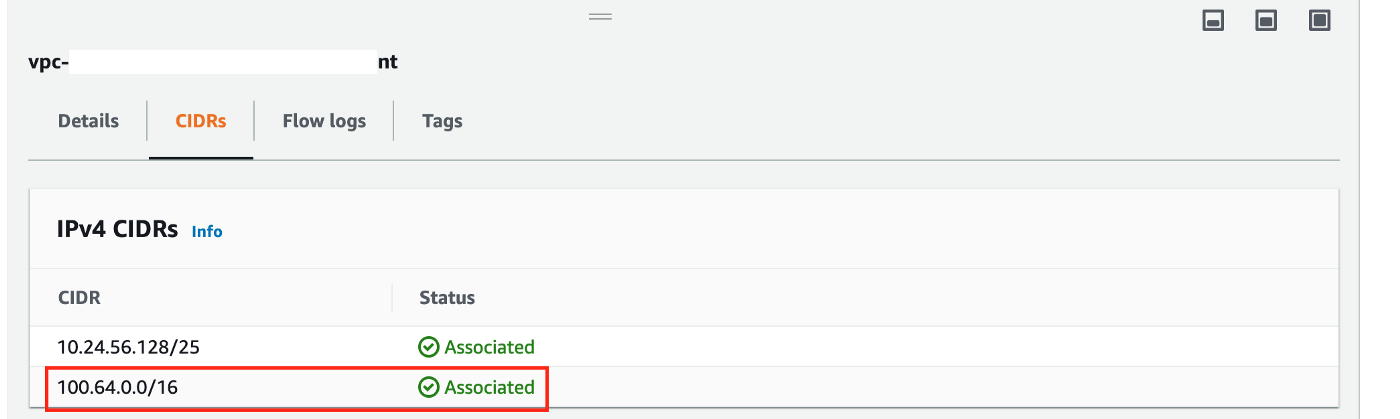
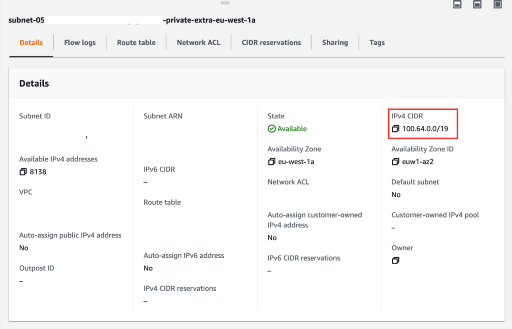
Now we can check the AWS console to make sure everything was correctly set up
Additional CIDR successfully associated with our VPC
New subnets created (only showing az-1a here)
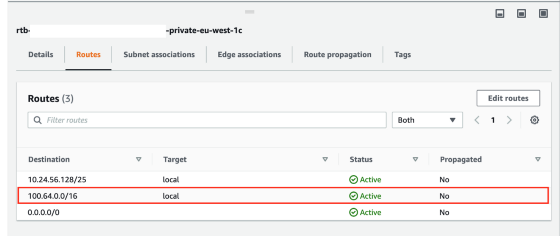
New routes added to existing VPC route tables (only showing az-1a here)
Creating the EKS cluster and using the new CIDR block
Now that we have a new CIDR block associated with our VPC we are ready to create the EKS cluster and use custom networking with AWS VPC CNI.
For simplicity, I’ll be using the official EKS terraform module
module "eks" {
  source                                         = "terraform-aws-modules/eks/aws"
  version                                        = "v17.20.0"
  cluster_name                                   = "dev-cluster"
  cluster_version                                = "1.20"
  subnets                                        = ["10.24.56.128/26", "10.24.56.192/27", "10.24.56.224/27"]
  vpc_id                                         = var.eks_vpc_id
  cluster_endpoint_private_access                = true // In this example, we only want to allow access to the Kubernetes API from within our enterprise network
  cluster_create_endpoint_private_access_sg_rule = true
  cluster_endpoint_private_access_cidrs          = ["10.0.0.0/8"] // Your enterprise CIDR range that should be allowed access to the k8s API

  node_groups_defaults = {
    ami_type  = "AL2_x86_64"
    disk_size = 50
  }

  // Here we're using a managed EKS node group
  node_groups = {
    example = {
      desired_capacity = 2
      max_capacity     = 2
      min_capacity     = 2

      instance_types = ["t3.medium"]
      update_config = {
        max_unavailable_percentage = 50 # or set `max_unavailable`
      }
    }
  }

  depends_on = [
    aws_subnet.extra_az_1a,
    aws_subnet.extra_az_1b,
    aws_subnet.extra_az_1c,
    aws_route_table_association.a,
    aws_route_table_association.b,
    aws_route_table_association.c,
  ]
}
Make sure to use the subnets from your VPC main CIDR block in the subnets variable, not the ones we just created.
Installing AWS VPC CNI with custom networking
Since we want to keep everything as IaC, we’re going to set up the AWS VPC CNI add-on using the official helm chart. One tiny issue with this is that the helm chart is going to want to create the aws-node daemonset (L-IPAM daemon) to annotate it correctly. However, the EKS terraform module has already created the daemonset for us causing a conflict.
We can solve this by either deleting the daemonset and recreating it, or simply annotating that the existing daemonset should be managed by helm. We will go with the latter.
To keep this automated, create a new shell script annotate-nodes.sh with the following:
#!/bin/bash
set -euo pipefail

for kind in daemonSet clusterRole clusterRoleBinding serviceAccount; do
  echo "setting annotations and labels on $kind/aws-node"
  kubectl -n kube-system annotate --overwrite $kind aws-node meta.helm.sh/release-name=aws-vpc-cni
  kubectl -n kube-system annotate --overwrite $kind aws-node meta.helm.sh/release-namespace=kube-system
  kubectl -n kube-system label --overwrite $kind aws-node app.kubernetes.io/managed-by=Helm
done
Then we can run this script in our terraform configuration using a null_resource.
resource "null_resource" "annotate_nodes" {
  triggers = {
    "sha256" = filesha256("./annotate-nodes.sh")
  }

  provisioner "local-exec" {
    command = <<EOH
chmod 0755 annotate-nodes.sh
./annotate-nodes.sh
EOH
  }

  depends_on = [
    module.eks
  ]
}
Be careful with local-exec in terraform. Preferably validate hash sums of any executable you’re running
We can confirm that the daemonset was successfully annotated by running kubectl describe daemonset aws-node --namespace kube-system
Name: aws-node
Selector: k8s-app=aws-node
Node-Selector: <none>
Annotations: meta.helm.sh/release-name: aws-vpc-cni
meta.helm.sh/release-namespace: kube-system
Deploying AWS VPC CNI with custom networking to our cluster
The way you tell your pods to be scheduled with IP addresses from the new subnets is by using a CRD called ENIConfig. An example ENIConfig might look something like this:
apiVersion: crd.k8s.amazonaws.com/v1alpha1
kind: ENIConfig
metadata:
 name: group1-pod-netconfig
spec:
 subnet: subnet-04f960ffc8be6865c
 securityGroups:
 - sg-070d03008bda531ad
 - sg-06e5cab8e5d6f16ef
Every node in your cluster is then annotated with k8s.amazonaws.com-eniConfig to specify which ENIConfig to use. An example would be:
k8s.amazonaws.com/eniConfig=group1-pod-netconfigBut what about automation? How do we ensure new nodes get the correct ENIConfig?! YOU PROMISED AUTOMATION!!
Yes, a promise is a promise! Let’s automate this using the AWS VPC CNI helm chart and make sure all new nodes are annotated automatically. We will use the terraform helm provider to deploy this helm chart. It’s important that we use our new subnets and not the ones associated with the main CIDR block. Remember, we want your pods to start using IPs from the new additional CIDR block!
resource "helm_release" "this" {
  name      = "aws-vpc-cni"
  namespace = "kube-system"

  repository = "https://aws.github.io/eks-charts"
  chart      = "aws-vpc-cni"

  values = [
    <<EOT
crd:
  create: false # CRDs were created by the EKS module
originalMatchLabels: true
eniConfig:
  create: true
  region: eu-west-1
  subnets:
    a:
      id: ${aws_subnet.extra_az_1a.id}
      securityGroups:
      - ${module.eks.worker_security_group_id}
    b:
      id: ${aws_subnet.extra_az_1b.id}
      securityGroups:
      - ${module.eks.worker_security_group_id}
    c:
      id: ${aws_subnet.extra_az_1c.id}
      securityGroups:
      - ${module.eks.worker_security_group_id}
env:
  AWS_VPC_K8S_CNI_CUSTOM_NETWORK_CFG: true
  ENI_CONFIG_LABEL_DEF: "failure-domain.beta.kubernetes.io/zone"
EOT
  ]
}
How exactly will this make sure that our pods are automatically annotated to use the correct ENIConfig? This is thanks to these environment variables we defined above:
AWS_VPC_K8S_CNI_CUSTOM_NETWORK_CFG: true
ENI_CONFIG_LABEL_DEF: "failure-domain.beta.kubernetes.io/zone"
ENI_CONFIG_LABEL_DEF will ensure that in a high availability cluster, nodes will get the correct ENIConfig for that specific availability zone. More on the label here.
Almost there
Awesome, we’re almost there! We’ve configured the cluster to use custom networking with the AWS VPC CNI and our pods will no longer use IPs from the VPCs main CIDR block. The very last thing to do is cycle the nodes to make sure any running/new pods will be assigned to their correct IP addresses.
We’ll do this in an automated fashion once again.
Create a new shell script cycle-nodes.sh
#!/bin/bash
usage() { echo "Usage: $0 [-c <cluster-name>] [-a <assume-role>]" 1>&2; exit 1; }

while getopts ":c:a:" o; do
    case "${o}" in
        c)
            CLUSTER=${OPTARG}
            ;;
        a)
            ASSUME_ROLE_ARN=${OPTARG}
            ;;
        *)
            usage
            ;;
    esac
done
shift $((OPTIND-1))

if [ -z "${CLUSTER}" ]; then
    usage
fi

if [ ! -z "$ASSUME_ROLE_ARN" ]; then
  temp_role=$(aws sts assume-role \
      --role-arn $ASSUME_ROLE_ARN \
      --role-session-name temp)

  export AWS_ACCESS_KEY_ID=$(echo $temp_role | jq -r .Credentials.AccessKeyId)
  export AWS_SECRET_ACCESS_KEY=$(echo $temp_role | jq -r .Credentials.SecretAccessKey)
  export AWS_SESSION_TOKEN=$(echo $temp_role | jq -r .Credentials.SessionToken)

  aws configure set aws_access_key_id $AWS_ACCESS_KEY_ID
  aws configure set aws_secret_access_key $AWS_SECRET_ACCESS_KEY
  aws configure set aws_session_token $AWS_SESSION_TOKEN
fi


# Get a list of all the instances in the node group
comm=`printf "aws ec2 describe-instances --query 'Reservations[*].Instances[*].InstanceId' --filters "Name=tag-key,Values=eks:cluster-name" "Name=tag-value,Values=$CLUSTER" --output text"`
INSTANCE_IDS=(`eval $comm`)
target=$(kubectl get nodes | grep Read | wc -l)
# iterate through nodes - terminate one at a time
for i in "${INSTANCE_IDS[@]}"
do
curr=0
echo "Terminating EC2 instance $i ... "
aws ec2 terminate-instances --instance-ids $i | jq -r .TerminatingInstances[0].CurrentState.Name
while [ $curr -ne $target ]; do
    stat=$(aws ec2 describe-instance-status --instance-ids $i  --include-all-instances | jq -r .InstanceStatuses[0].InstanceState.Name)

    if [ "$stat" == "terminated" ]; then
        sleep 15
        curr=$(kubectl get nodes | grep -v NotReady | grep Read | wc -l)
        kubectl get nodes
        echo "Current Ready nodes = $curr of $target"
    fi
    if [ "$stat" != "terminated" ]; then
        sleep 10
        echo "$i $stat"
    fi
done
done
echo "done"
Use a null_resource to run this script in terraform:
resource "null_resource" "cycle_nodes" {
  triggers = {
    "sha256" = filesha256("./cycle-nodes.sh")
  }

  provisioner "local-exec" {
    command = <<EOH
chmod 0755 cycle-nodes.sh
./cycle-nodes.sh -c dev-cluster
EOH
  }

  depends_on = [
    module.eni_config
  ]
}
Let’s confirm that the nodes are correctly annotated by running:
kubectl describe nodes | grep 'topology.kubernetes.io/zone'
In my case, since I’m running 2 nodes. One in az-1a and one in az-1b I get the following output:
topology.kubernetes.io/zone=eu-west-1a
topology.kubernetes.io/zone=eu-west-1b
Great job, that’s it! 🎉
Let’s try deploying something into the cluster and see the hard work we’ve done in action!
Let’s deploy nginx into a new test namespace:
kubectl create namespace test
kubectl create deployment --namespace test nginx --image=nginx --replicas=2
Get the pods from our new test namespace to check which IPs the pods got:
kubectl get pod --namespace test -o wide
This should return something like:
NAME                     READY   STATUS    RESTARTS   AGE    IP             NODE                                         NOMINATED NODE   READINESS GATES
nginx-6799fc88d8-fdfgz   1/1     Running   0          4d6h   100.64.11.69   ip-10-24-56-159.eu-west-1.compute.internal   <none>           <none>
nginx-6799fc88d8-td9w5   1/1     Running   0          4d6h   100.64.49.61   ip-10-24-56-217.eu-west-1.compute.internal   <none>           <none>
As we can see, the actual nodes are on the main CIDR block 10.24.56.128/25 but our pods are now getting IP addresses from our new additional CIDR block (100.64.11.69 and 100.64.49.61).
Conclusion
AWS VPC CNI can be powerful enough to do advanced networking as we can see from this article. There are still some limitations that AWS has to work on such as ENI limitation which limits the amount of pods you can run for every node. Maybe I can cover this in another article.
But all in all, the AWS VPC CNI has flexible networking settings to make it work well in big enterprise environments.
If you want even more control over your Kubernetes networking, AWS supports alternative CNIs such as Calico. Keep in mind that when using something like Calico you lose access to the control plane from your pods and running things like service meshes can be challenging.
All code used in this article is found here.
Thank you for reading and don’t hesitate to reach out if you have any questions. !#/Joakim